<?xml version="1.0" ?>
<module xmlns="urn:jboss:module:1.3" name="org.postgresql">

    <resources>
        <resource-root path="postgresql-9.4.1212.jar"/>
    </resources>

    <dependencies>
        <module name="javax.api"/>
        <module name="javax.transaction.api"/>
    </dependencies>
</module>Package the JDBC Driver
Find and download the JDBC driver JAR for your RDBMS. Before you can use this driver, you must package it up into a module and install it into the server. Modules define JARs that are loaded into the Keycloak classpath and the dependencies those JARs have on other modules. They are pretty simple to set up.
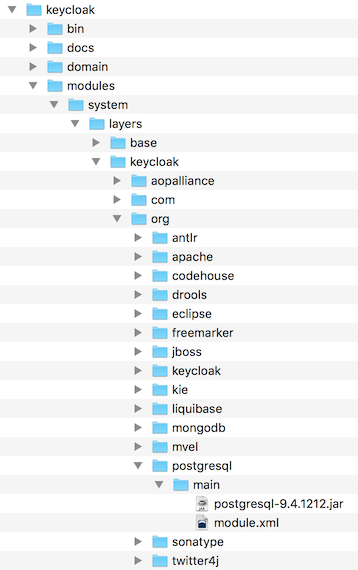
Within the …/modules/ directory of your Keycloak distribution, you need to create a directory structure to hold your module definition. The convention is use the Java package name of the JDBC driver for the name of the directory structure. For PostgreSQL, create the directory org/postgresql/main. Copy your database driver JAR into this directory and create an empty module.xml file within it too.

After you have done this, open up the module.xml file and create the following XML:
The module name should match the directory structure of your module. So, org/postgresql maps to org.postgresql. The resource-root path attribute should specify the JAR filename of the driver. The rest are just the normal dependencies that any JDBC driver JAR would have.
Declare and Load JDBC Driver
The next thing you have to do is declare your newly packaged JDBC driver into your deployment profile so that it loads and becomes available when the server boots up. Where you perform this action depends on your operating mode. If you’re deploying in standard mode, edit _…/standalone/configuration/standalone.xml. If you’re deploying in standard clustering mode, edit …/standalone/configuration/standalone-ha.xml. If you’re deploying in domain mode, edit …/domain/configuration/domain.xml. In domain mode, you’ll need to make sure you edit the profile you are using: either auth-server-standalone or auth-server-clustered
Within the profile, search for the drivers XML block within the datasources subsystem. You should see a pre-defined driver declared for the H2 JDBC driver. This is where you’ll declare the JDBC driver for your external database.
  <subsystem xmlns="urn:jboss:domain:datasources:4.0">
     <datasources>
       ...
       <drivers>
          <driver name="h2" module="com.h2database.h2">
              <xa-datasource-class>org.h2.jdbcx.JdbcDataSource</xa-datasource-class>
          </driver>
       </drivers>
     </datasources>
  </subsystem>
Within the drivers XML block you’ll need to declare an additional JDBC driver. It needs to have a name which you can choose to be anything you want. You specify the module attribute which points to the module package you created earlier for the driver JAR. Finally you have to specify the driver’s Java class. Here’s an example of installing PostgreSQL driver that lives in the module example defined earlier in this chapter.
  <subsystem xmlns="urn:jboss:domain:datasources:4.0">
     <datasources>
       ...
       <drivers>
          <driver name="postgresql" module="org.postgresql">
              <xa-datasource-class>org.postgresql.xa.PGXADataSource</xa-datasource-class>
          </driver>
          <driver name="h2" module="com.h2database.h2">
              <xa-datasource-class>org.h2.jdbcx.JdbcDataSource</xa-datasource-class>
          </driver>
       </drivers>
     </datasources>
  </subsystem>