Brokering Overview
When using Keycloak as an identity broker, users are not forced to provide their credentials in order to authenticate in a specific realm. Instead, they are presented with a list of identity providers from which they can authenticate.
You can also configure a default broker. In this case the user will not be given a choice, but instead be redirected directly to the parent broker.
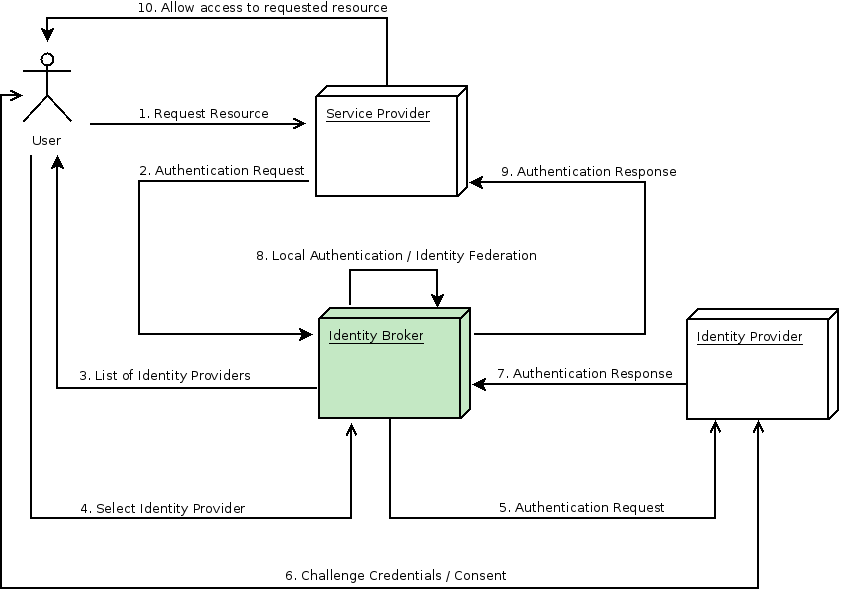
The following diagram demonstrates the steps involved when using Keycloak to broker an external identity provider:
-
User is not authenticated and requests a protected resource in a client application.
-
The client applications redirects the user to Keycloak to authenticate.
-
At this point the user is presented with the login page where there is a list of identity providers supported by a realm.
-
User selects one of the identity providers by clicking on its respective button or link.
-
Keycloak issues an authentication request to the target identity provider asking for authentication and the user is redirected to the login page of the identity provider. The connection properties and other configuration options for the identity provider were previously set by the administrator in the Admin Console.
-
User provides his credentials or consent in order to authenticate in the identity provider.
-
Upon a successful authentication by the identity provider, the user is redirected back to Keycloak with an authentication response. Usually this response contains a security token that will be used by Keycloak to trust the authentication performed by the identity provider and retrieve information about the user.
-
Now Keycloak is going to check if the response from the identity provider is valid. If valid, it will import and create a new user or just skip that if the user already exists. If it is a new user, Keycloak may ask the identity provider for information about the user if that info doesn’t already exist in the token. This is what we call identity federation. If the user already exists Keycloak may ask him to link the identity returned from the identity provider with his existing account. We call this process account linking. What exactly is done is configurable and can be specified by setup of First Login Flow . At the end of this step, Keycloak authenticates the user and issues its own token in order to access the requested resource in the service provider.
-
Once the user is locally authenticated, Keycloak redirects the user to the service provider by sending the token previously issued during the local authentication.
-
The service provider receives the token from Keycloak and allows access to the protected resource.
There are some variations of this flow that we will talk about later. For instance, instead of presenting a list of identity providers, the client application can request a specific one. Or you can tell Keycloak to force the user to provide additional information before federating his identity.
|
Note
|
Different protocols may require different authentication flows. At this moment, all the identity providers supported by Keycloak use a flow just like described above. However, despite the protocol in use, user experience should be pretty much the same. |
As you may notice, at the end of the authentication process Keycloak will always issue its own token to client applications. What this means is that client applications are completely decoupled from external identity providers. They don’t need to know which protocol (eg.: SAML, OpenID Connect, OAuth, etc) was used or how the user’s identity was validated. They only need to know about Keycloak.