sudo kadmin.localKerberos
Keycloak supports login with a Kerberos ticket through the SPNEGO protocol. SPNEGO (Simple and Protected GSSAPI Negotiation Mechanism) is used to authenticate transparently through the web browser after the user has been authenticated when logging-in his session. For non-web cases or when ticket is not available during login, Keycloak also supports login with Kerberos username/password.
A typical use case for web authentication is the following:
-
User logs into his desktop (Such as a Windows machine in Active Directory domain or Linux machine with Kerberos integration enabled).
-
User then uses his browser (IE/Firefox/Chrome) to access a web application secured by Keycloak.
-
Application redirects to Keycloak login.
-
Keycloak renders HTML login screen together with status 401 and HTTP header
WWW-Authenticate: Negotiate -
In case that the browser has Kerberos ticket from desktop login, it transfers the desktop sign on information to the Keycloak in header
Authorization: Negotiate 'spnego-token'. Otherwise it just displays the login screen. -
Keycloak validates token from the browser and authenticates the user. It provisions user data from LDAP (in case of LDAPFederationProvider with Kerberos authentication support) or let user to update his profile and prefill data (in case of KerberosFederationProvider).
-
Keycloak returns back to the application. Communication between Keycloak and application happens through OpenID Connect or SAML messages. The fact that Keycloak was authenticated through Kerberos is hidden from the application. So Keycloak acts as broker to Kerberos/SPNEGO login.
For setup there are 3 main parts:
-
Setup and configuration of Kerberos server (KDC)
-
Setup and configuration of Keycloak server
-
Setup and configuration of client machines
Setup of Kerberos server
This is platform dependent. Exact steps depend on your OS and the Kerberos vendor you’re going to use. Consult Windows Active Directory, MIT Kerberos and your OS documentation for how exactly to setup and configure Kerberos server.
At least you will need to:
-
Add some user principals to your Kerberos database. You can also integrate your Kerberos with LDAP, which means that user accounts will be provisioned from LDAP server.
-
Add service principal for "HTTP" service. For example if your Keycloak server will be running on
www.mydomain.orgyou may need to add principalHTTP/www.mydomain.org@MYDOMAIN.ORGassuming that MYDOMAIN.ORG will be your Kerberos realm.For example on MIT Kerberos you can run a "kadmin" session. If you are on the same machine where is MIT Kerberos, you can simply use the command:
Then add HTTP principal and export his key to a keytab file with the commands like:
addprinc -randkey HTTP/www.mydomain.org@MYDOMAIN.ORG
ktadd -k /tmp/http.keytab HTTP/www.mydomain.org@MYDOMAIN.ORG
The Keytab file /tmp/http.keytab will need to be accessible on the host where Keycloak server will be running.
Setup and configuration of Keycloak server
You need to install a kerberos client on your machine. This is also platform dependent.
If you are on Fedora, Ubuntu or RHEL, you can install the package freeipa-client, which contains a Kerberos client and several other utilities.
Configure the kerberos client (on linux it’s in file /etc/krb5.conf ). You need to put your Kerberos realm and at least configure the HTTP domains your server will be running on.
For the example realm MYDOMAIN.ORG you may configure the domain_realm section like this:
[domain_realm]
  .mydomain.org = MYDOMAIN.ORG
  mydomain.org = MYDOMAIN.ORG
Next you need to export the keytab file with the HTTP principal and make sure the file is accessible to the process under which Keycloak server is running.
For production, it’s ideal if it’s readable just by this process and not by someone else.
For the MIT Kerberos example above, we already exported keytab to /tmp/http.keytab . If your KDC and Keycloak are running on same host,
you have that file already available.
Enable SPNEGO Processing
Keycloak does not have the SPNEGO protocol support turned on by default. So, you have to go to the browser flow
and enable Kerberos.
Browser Flow
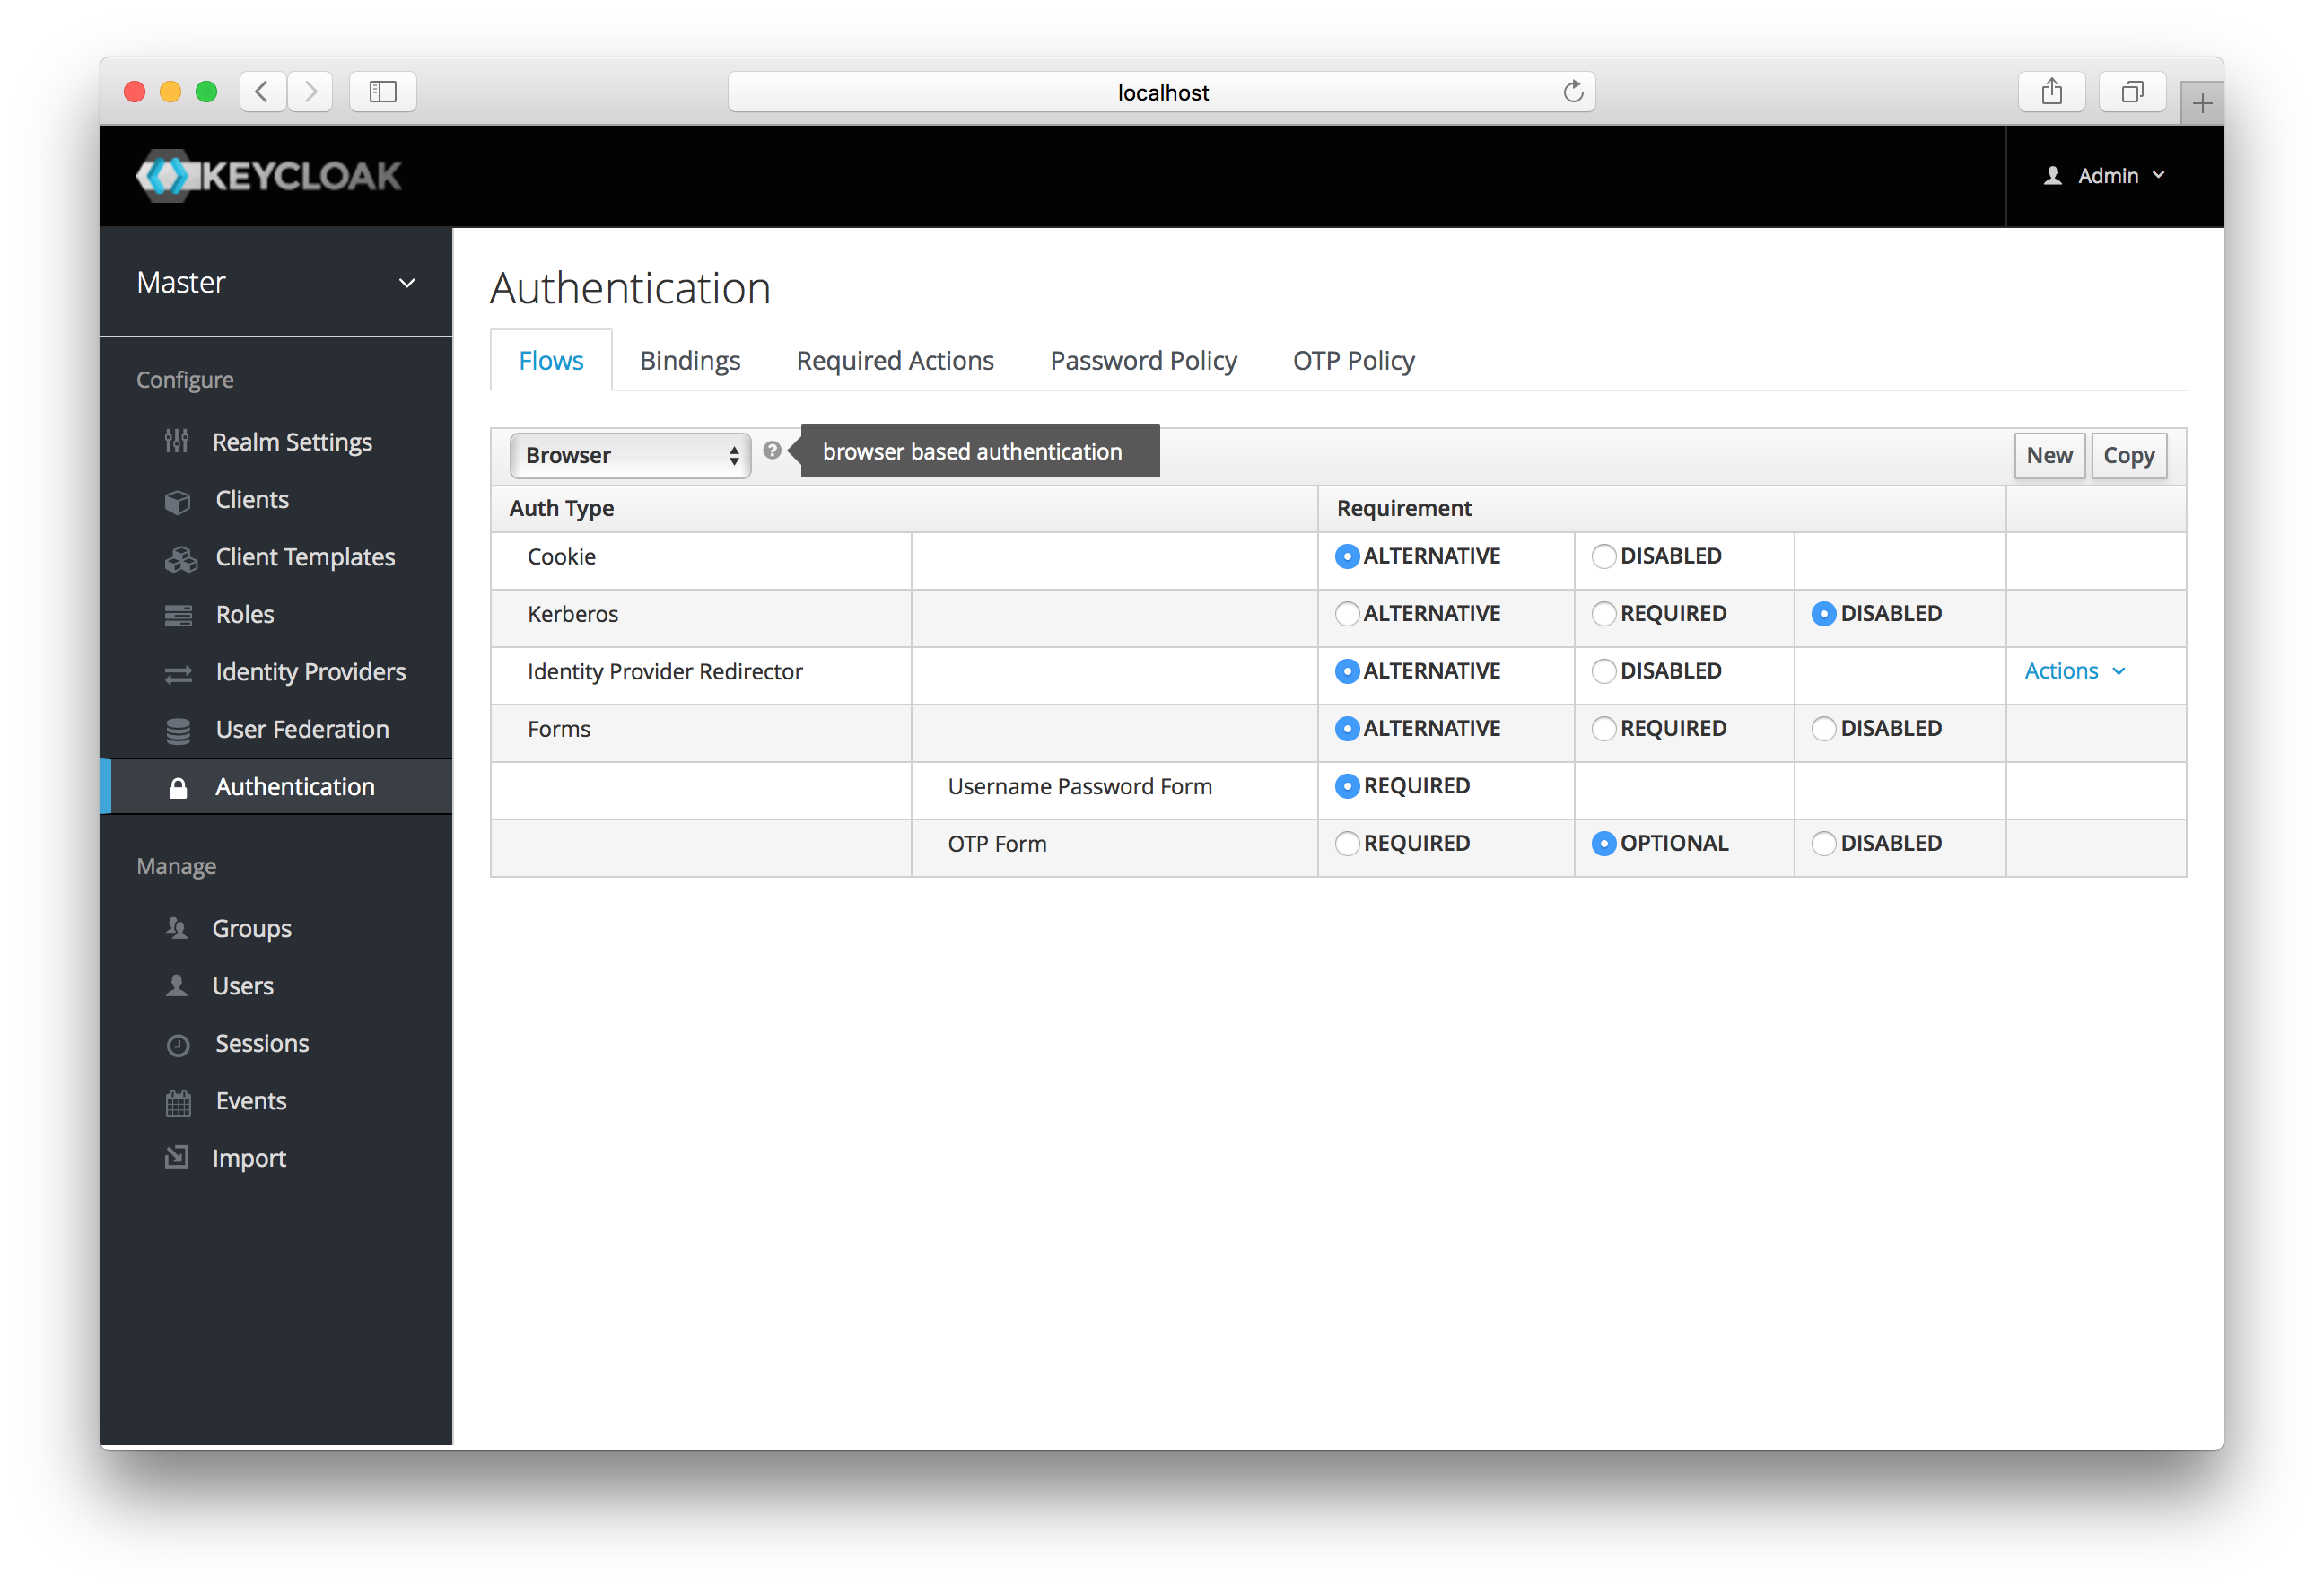
Switch the Kerberos requirement from disabled to either alternative or required. Alternative basically means that Kerberos is optional. If
the user’s browser hasn’t been configured to work with SPNEGO/Kerberos, then Keycloak will fall back to the regular login screens. If you set the requirement
to required then all users must have Kerberos enabled for their browser.
Configure Kerberos User Storage Federation Provider
Now that the SPNEGO protocol is turned on at the authentication server, you’ll need to configure how Keycloak interprets the Kerberos ticket. This is done through User Storage Federation. We have 2 different federation providers with Kerberos authentication support.
If you want to authenticate with Kerberos backed by an LDAP server, you have to first configure the LDAP Federation Provider.
If you look at the configuration page for your LDAP provider you’ll see a Kerberos Integration section.
LDAP Kerberos Integration
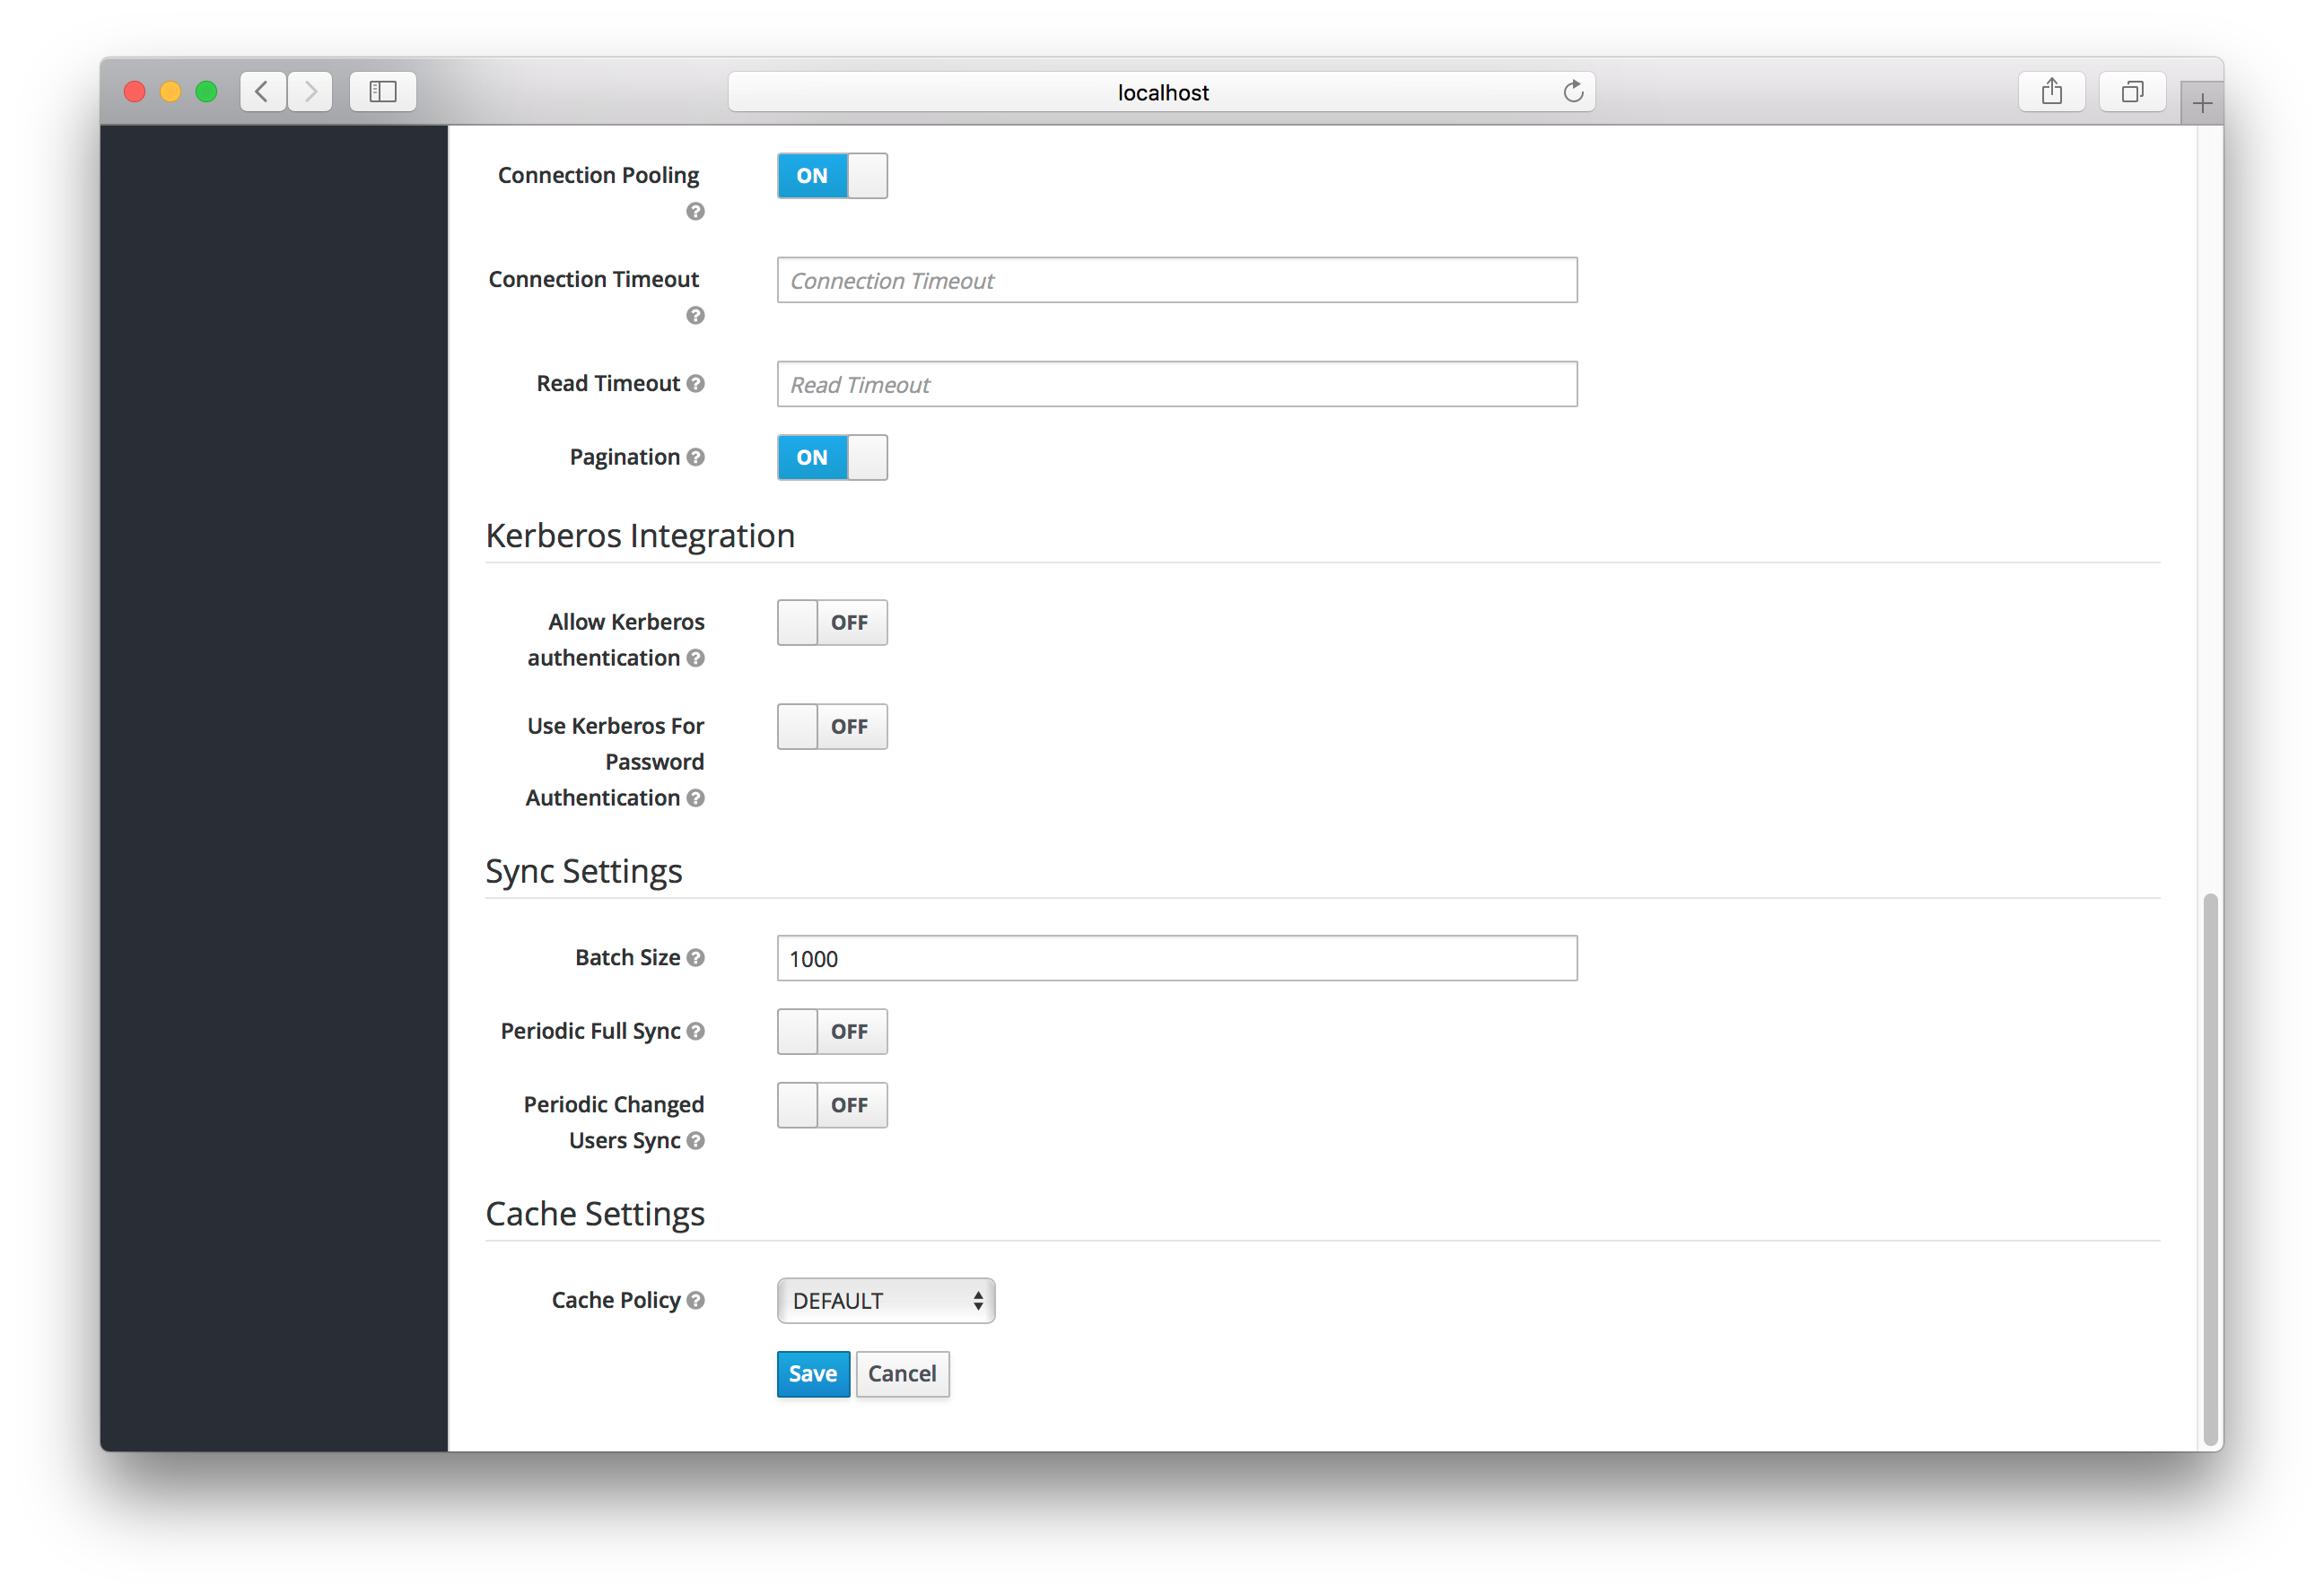
Turning on the switch Allow Kerberos authentication will make Keycloak use the Kerberos principal to lookup information about the user so that it can
be imported into the Keycloak environment.
If your Kerberos solution is not backed by an LDAP server, you have to use the Kerberos User Storage Federation Provider. Go to the User Federation
left menu item and select Kerberos from the Add provider select box.
Kerberos User Storage Provider
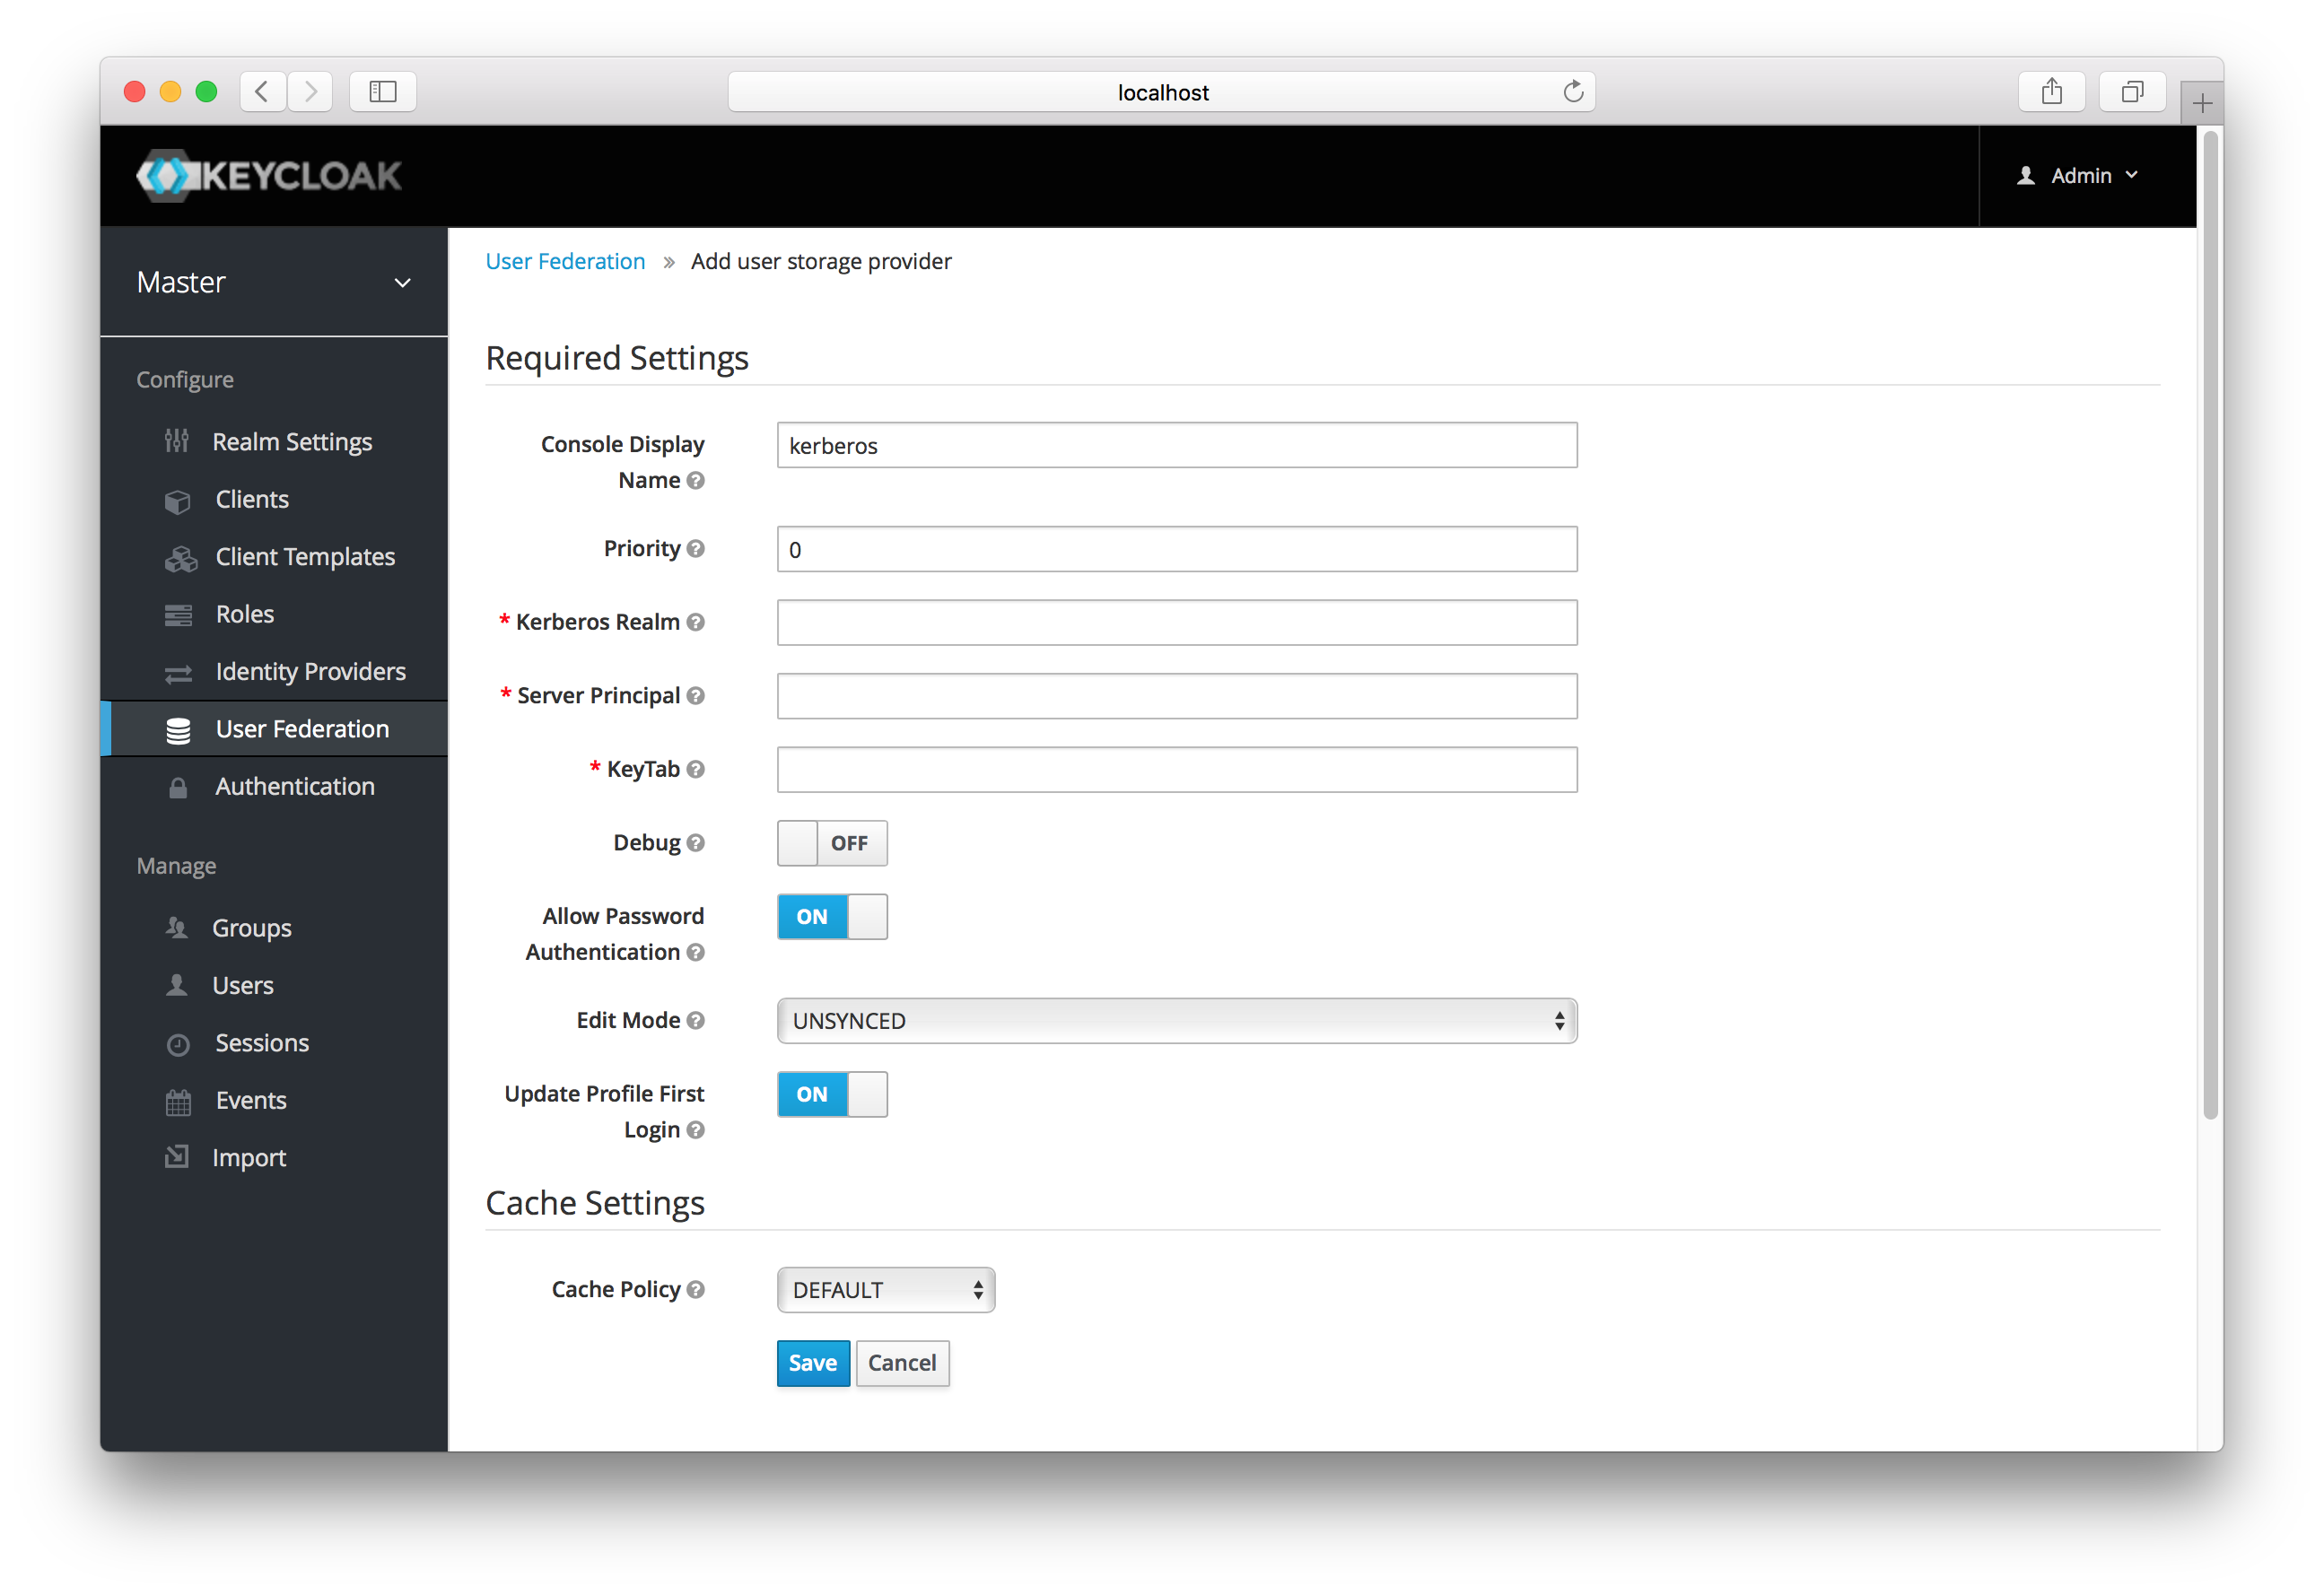
This provider parses the Kerberos ticket for simple principal information and does a small import into the local Keycloak database. User profile information like first name, last name, and email are not provisioned.
Setup and configuration of client machines
Clients need to install kerberos client and setup krb5.conf as described above.
Additionally they need to enable SPNEGO login support in their browser.
See configuring Firefox for Kerberos if you are using that browser.
URI .mydomain.org must be allowed in the network.negotiate-auth.trusted-uris config option.
In a Windows domain, clients usually don’t need to configure anything special as IE is already able to participate in SPNEGO authentication for the Windows domain.
Example setups
For easier testing with Kerberos, we provided some example setups to test.
Keycloak and FreeIPA docker image
Once you install docker, you can run docker image with FreeIPA server installed. FreeIPA provides integrated security solution with MIT Kerberos and 389 LDAP server among other things . The image provides also Keycloak server configured with LDAP Federation provider and enabled SPNEGO/Kerberos authentication against the FreeIPA server. See details here .
Credential Delegation
Kerberos 5 supports the concept of credential delegation. In this scenario, your applications may want access to the Kerberos ticket so that
they can re-use it to interact with other services secured by Kerberos. Since the SPNEGO protocol is processed in the Keycloak server,
you have to propagate the GSS credential to your application
within the OpenID Connect token claim or a SAML assertion attribute that is transmitted to your application from the Keycloak server.
To have this claim inserted into the token or assertion, each application will need to enable the built-in protocol mapper called gss delegation credential.
This is enabled in the Mappers tab of the application’s
client page. See Protocol Mappers chapter for more details.
Applications will need to deserialize the claim it receives from Keycloak before it can use it to make GSS calls against other services.
Once you deserialize the credential from the access token to the GSSCredential object, the GSSContext will need to be created with this credential
passed to the method GSSManager.createContext for example like this:
// Obtain accessToken in your application.
KeycloakPrincipal keycloakPrincipal = (KeycloakPrincipal) servletReq.getUserPrincipal();
AccessToken accessToken = keycloakPrincipal.getKeycloakSecurityContext().getToken();

// Retrieve kerberos credential from accessToken and deserialize it
String serializedGssCredential = (String) accessToken.getOtherClaims().
    get(org.keycloak.common.constants.KerberosConstants.GSS_DELEGATION_CREDENTIAL);

GSSCredential deserializedGssCredential = org.keycloak.common.util.KerberosSerializationUtils.
    deserializeCredential(serializedGssCredential);

// Create GSSContext to call other kerberos-secured services
GSSContext context = gssManager.createContext(serviceName, krb5Oid,
    deserializedGssCredential, GSSContext.DEFAULT_LIFETIME);
We have an example, that shows this in detail.
It’s in examples/kerberos in the Keycloak example distribution or demo distribution download.
You can also check the example sources directly here .
Note that you also need to configure forwardable kerberos tickets in krb5.conf file and add support for delegated credentials to your browser.
|
Warning
|
Credential delegation has some security implications so only use it if you really need it. It’s highly recommended to use it together with HTTPS. See for example this article for more details. |
Troubleshooting
If you have issues, we recommend that you enable additional logging to debug the problem:
-
Enable
Debugflag in admin console for Kerberos or LDAP federation providers -
Enable TRACE logging for category
org.keycloakin logging section ofstandalone/configuration/standalone.xmlto receive more infostandalone/log/server.log -
Add system properties
-Dsun.security.krb5.debug=trueand-Dsun.security.spnego.debug=true